Chef Dalila
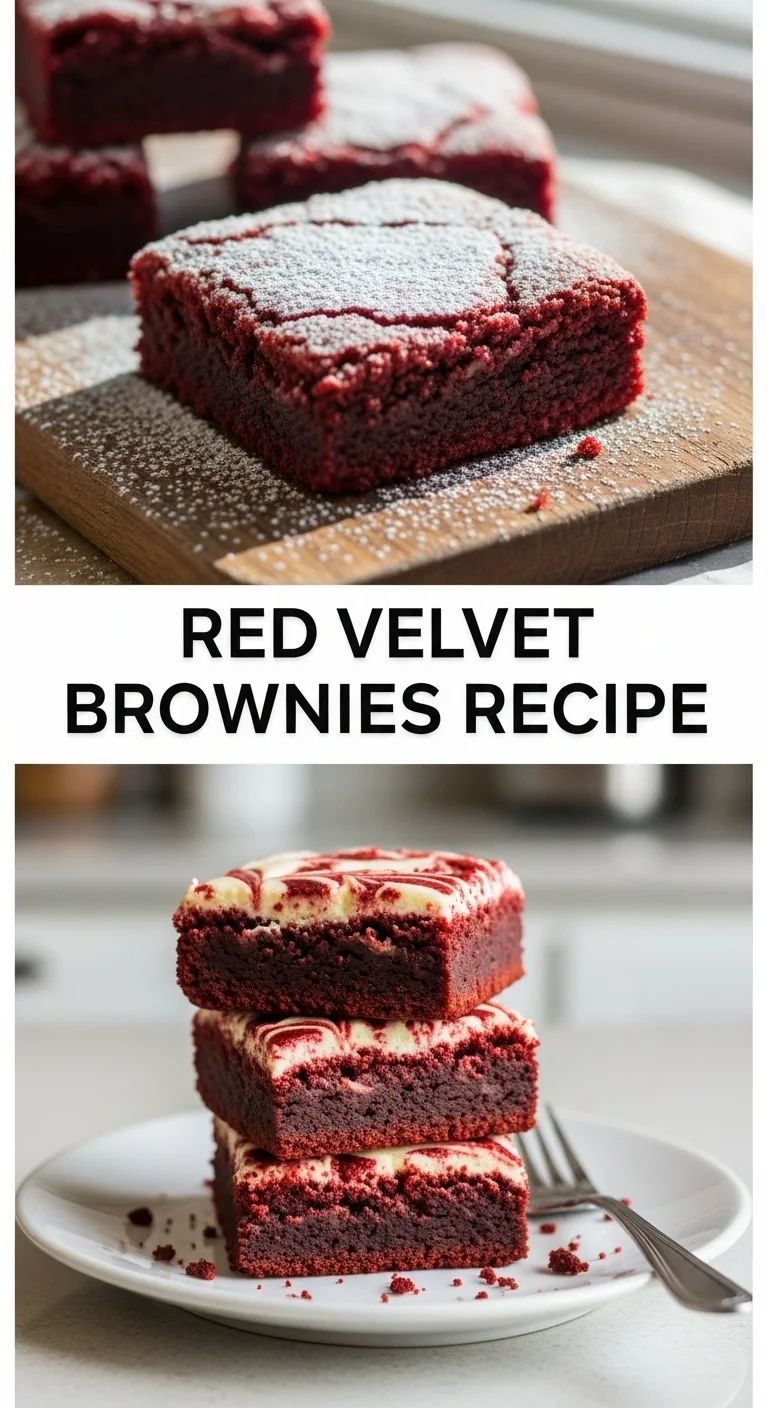
Red Velvet Brownies Recipe. Just the sound of it conjures images of deep crimson, rich chocolate, and a hint of something special.
This Valentine’s Day, why settle for a basic box of chocolates when you can whip up something truly memorable? Here at Let Them Cooke, we believe every dessert tells a story, and a batch of these fudgy, vibrant Red Velvet Brownies Recipe squares speaks volumes of love and indulgence.

What makes Red Velvet Brownies an irresistible twist on a classic dessert?
If you’re anything like me, you appreciate a good classic, but sometimes, a little flair makes all the difference. That’s exactly what you get with a stellar Red Velvet Brownies Recipe. It’s a delightful fusion, taking the best of both worlds and creating something utterly unique.
Beyond the Usual Chocolate Square
Forget everything you thought you knew about your average brownie. This Red Velvet Brownies Recipe isn’t just a chocolate brownie dyed red. Oh no, it’s so much more! It boasts that signature red velvet tang, often thanks to a touch of vinegar and buttermilk, which plays beautifully against the rich cocoa. It’s a sophisticated take on a beloved treat, perfect for a romantic evening or a festive gathering. When you’re looking for that special something, this red velvet dessert hits all the right notes.
The Allure of Red for Romance
Let’s be honest, the color alone makes this Red Velvet Brownies Recipe a showstopper, especially around Valentine’s Day. That deep, passionate red isn’t just pretty; it’s inviting, a visual promise of the deliciousness to come. It instantly elevates these from a simple snack to a celebratory confection. Imagine serving these alongside some Slice and Bake Heart Cookies – talk about making an impression!
A Texture Dream Come True
Beyond the color, it’s the texture that truly sets this Red Velvet Brownies Recipe apart. We’re talking about a dense, fudgy interior with just the right amount of chewiness around the edges. It’s not cakey, not crumbly, but perfectly moist. Every bite of these moist red velvet bars melts in your mouth, leaving you craving another. It’s a textural masterpiece that’s surprisingly easy to achieve with the right approach.
What essential ingredients are key to achieving that signature fudgy texture and vibrant color?
Crafting the perfect Red Velvet Brownies Recipe starts with understanding its building blocks. Each ingredient plays a vital role in creating that iconic flavor, color, and melt-in-your-mouth texture. It’s a careful balance, but one that’s absolutely worth mastering.
The Power of Quality Cocoa and Color
For a truly vibrant Red Velvet Brownies Recipe, don’t skimp on your cocoa powder. A good quality unsweetened cocoa powder red velvet base is crucial. It’s not just about adding chocolate flavor; it reacts with the acidic ingredients to help deepen the red hue. And for that show-stopping color? A high-quality red food coloring, gel works best, is your best friend. It ensures a rich, consistent red that won’t fade during baking, making these chocolate red velvet brownies pop.
Butter, Sugar, and Egg Magic
These are the workhorses of any good brownie, and they’re especially important in a Red Velvet Brownies Recipe. Melted butter is key for that fudgy texture, while a generous amount of sugar ensures sweetness and helps retain moisture. Eggs bind everything together, adding richness and contributing to the chewy texture. Getting the right ratio here is foundational for an easy brownie recipe that truly delivers.
A Touch of Tang: Buttermilk and Vinegar
This is where the red velvet magic truly happens in your Red Velvet Brownies Recipe. Buttermilk and white vinegar aren’t just for adding a subtle tang; they also react with the cocoa powder and baking soda, enhancing the red color and contributing to that classic red velvet flavor profile. Don’t skip these! They are what make these red velvet dessert bars uniquely delicious. If you’re out of buttermilk, a quick DIY substitute (milk + a touch of lemon juice or vinegar) works wonders.
The Secret Weapon: Chocolate Chips
While optional, adding a handful of chocolate chips to your Red Velvet Brownies Recipe batter can elevate them from great to absolutely divine. They melt into little pockets of gooey chocolate, adding another layer of indulgence and ensuring every bite is packed with chocolatey goodness. White chocolate chips also offer a lovely contrast in both color and flavor, especially if you’re thinking about serving these with Heavenly Red Velvet Cinnamon Rolls.
How can you master the baking process to ensure perfectly moist and flavorful Red Velvet Brownies every time?
Baking a perfect Red Velvet Brownies Recipe isn’t just about the ingredients; it’s about the technique. A few simple baking tips for brownies can make all the difference between a good batch and an unforgettable one.
Precise Mixing, Not Overmixing
When making your Red Velvet Brownies Recipe, mix the wet and dry ingredients just until combined. Overmixing develops gluten, which can lead to tough, cake-like brownies instead of the fudgy squares you’re aiming for. A gentle hand is key here. You want to see just a few streaks of flour before you stop, ensuring your chocolate red velvet brownies stay tender.
Temperature Matters: Oven and Batter
Preheating your oven properly is non-negotiable for any Red Velvet Brownies Recipe. A consistent oven temperature ensures even baking. Also, make sure your ingredients (especially eggs and buttermilk) are at room temperature. This allows them to emulsify better, creating a smoother, more uniform batter and a truly moist red velvet bar. This small step makes a big difference in the final product.
The Doneness Dilemma
Knowing when your Red Velvet Brownies Recipe is done is a bit of an art. You want them to be set around the edges but still slightly gooey in the center. A toothpick inserted into the center should come out with moist crumbs, not wet batter, but also not perfectly clean. Slightly underbaking is the secret to fudginess! Trust your instincts and err on the side of caution. A few minutes too long can turn perfect brownies into dry ones.
Cooling is Crucial
I know, I know, the smell is intoxicating, and you want to dig in right away. But resisting the urge to cut into your Red Velvet Brownies Recipe too soon is vital. Let them cool completely in the pan before slicing. This allows them to set properly, preventing them from crumbling and ensuring those clean, beautiful cuts. Patience, my friend, is a virtue, especially when it comes to these delightful red velvet dessert squares. Imagine them cooling while you prepare some Pink Velvet Cinnamon Rolls!
What are the most creative and delicious ways to customize your Red Velvet Brownies?
While a classic Red Velvet Brownies Recipe is fantastic on its own, there’s always room to play! Personalizing your batch makes them even more special, especially for occasions like Valentine’s Day. Get ready to impress!
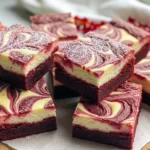
The Classic Cream Cheese Swirl
This is a non-negotiable for many Red Velvet Brownies Recipe enthusiasts. A tangy cream cheese frosting brownies swirl not only adds another layer of flavor but also creates a beautiful visual contrast against the deep red. Simply whip together cream cheese, powdered sugar, vanilla, and a touch of butter, then dollop and swirl into the brownie batter before baking. It’s a match made in heaven, turning a great brownie into an extraordinary one. You could even use a similar cream cheese base for your strawberry cream cheese heart danishes.
Flavor Boosters and Add-ins
Want to take your Red Velvet Brownies Recipe up a notch? Consider adding a teaspoon of espresso powder to deepen the chocolate flavor without making it taste like coffee. A splash of almond extract can also add a lovely subtle nuance. For texture, think about chopped nuts like pecans or walnuts, or even mini marshmallows stirred into the batter. These small tweaks can transform your chocolate red velvet brownies.
Festive Toppings for Valentine’s Day
For Valentine’s Day, go all out! Once your Red Velvet Brownies Recipe has cooled, dust them with powdered sugar through a heart-shaped stencil. Drizzle with melted white chocolate or a raspberry glaze. You could even top them with fresh raspberries, chocolate curls, or edible glitter. For a truly romantic touch, serve them with a scoop of vanilla bean ice cream. These ideas make your easy brownie recipe feel incredibly gourmet. Don’t forget to check out our Heart Shape Macarons for more romantic dessert inspiration!
“Baking is an act of love, and red velvet brownies are the perfect messenger for that sentiment.”
How do you troubleshoot common baking challenges and store your Red Velvet Brownies for maximum freshness?
Even the most seasoned baker can encounter a hiccup now and then. Don’t fret! Mastering your Red Velvet Brownies Recipe includes knowing how to fix common issues and how to keep them tasting great long after they’ve come out of the oven.
Tackling Dry or Crumbly Brownies
If your Red Velvet Brownies Recipe turns out dry or crumbly, the most likely culprit is overbaking. Remember our earlier tip: slightly underbake for fudginess! Another reason could be too much flour or not enough fat. Next time, double-check your measurements and consider adding an extra tablespoon of melted butter if the batter seems too thick. Practice makes perfect when it comes to achieving that ideal moist red velvet bar texture.
When the Color Isn’t Quite Right
Did your Red Velvet Brownies Recipe come out more brown than red? This can happen if you didn’t use enough food coloring, or if the quality of your cocoa powder red velvet base wasn’t ideal. Sometimes, the type of cocoa powder (natural vs. Dutch-processed) can also affect the final hue. For your next batch of chocolate red velvet brownies, try a high-quality gel food coloring for a more intense, stable color. A little extra goes a long way to make them visually stunning, perhaps even more vibrant than our Red Velvet Crinkle Cookies.
Storage Secrets for Lasting Indulgence
To keep your Red Velvet Brownies Recipe fresh and fudgy, store them in an airtight container at room temperature for up to 3-4 days. If they have a cream cheese frosting, they should be stored in the refrigerator and brought to room temperature before serving for the best texture. For longer storage, these easy brownie recipe treats freeze beautifully for up to 3 months. Just wrap them tightly in plastic wrap and then foil. Thaw them at room temperature when you’re ready for another delightful bite. They’re perfect for prepping ahead for special occasions, just like our Valentine’s Day Puff Pastry Hearts Recipe or even Strawberry Cheesecake Cookies Recipe and Vegan Love Letter Pastries for you.
Key Takeaways
- Red Velvet Brownies Recipe offers a unique, fudgy, and visually stunning twist on traditional brownies, perfect for celebrations like Valentine’s Day.
- Key ingredients like quality cocoa, buttermilk, and vinegar are essential for the signature flavor and vibrant red hue of your Red Velvet Brownies Recipe.
- Master the baking process by avoiding overmixing and slightly underbaking to achieve the ultimate moist and fudgy texture.
- Customize your Red Velvet Brownies Recipe with a cream cheese swirl, various add-ins, or festive toppings for an extra special touch.
- Troubleshoot common issues by adjusting baking times and food coloring, and ensure maximum freshness by storing your Red Velvet Brownies Recipe in an airtight container.
Red Velvet Brownies
Ingredients
Method
- Preheat your oven to 350°F (175°C) and grease a 9x13 inch baking pan.
- In a large bowl, mix the melted butter and sugar until well combined.
- Add in the eggs, buttermilk, vinegar, and red food coloring. Mix until smooth.
- In another bowl, whisk together the flour, cocoa powder, and baking soda.
- Gradually add the dry ingredients to the wet ingredients, mixing until just combined.
- Fold in chocolate chips if using.
- In a separate bowl, prepare the cream cheese swirl by beating together softened cream cheese, powdered sugar, vanilla extract, and butter until smooth.
- Pour the brownie batter into the prepared baking pan and smooth the top.
- Dollop spoonfuls of the cream cheese mixture over the brownie batter and use a knife to swirl it gently.
- Bake in the preheated oven for 25-30 minutes, or until the edges are set and a toothpick inserted into the center comes out with moist crumbs.
- Allow to cool in the pan completely before slicing.